
Installation guide
Timber cladding installation guide for the UK
This is our step-by-step guide to fitting external timber cladding in the UK, written in plain English for installers, builders, specifiers and homeowners. It covers storage, breather membranes, the ventilated cavity, battens, fixings, corners and openings.
It also gives installation details for our TF38 shadow gap, TF46 western red cedar shiplap and TF57 rebated profiles, and for secret fixing rhombus cladding with the Eurotec Façadeclip.
Your approved drawings, fire strategy, the Building Regulations and the instructions for any treatment, coating or fixing system always come first. If you are not sure, call us before you fix.
Quick answers
- Cavity: at least 25 mm, ventilated and drained, open at the top and bottom with insect mesh.
- Battens: treated to Use Class 3, typically 50 x 38 mm, at 450 mm centres and never more than 600 mm.
- Fixings: stainless steel (A2, or A4 near the coast), at least 2.5 times the board thickness long, two per board at every batten.
- Ground clearance: keep the bottom of the cladding at least 250 mm above finished ground unless the approved drawings show otherwise.
- Cut ends: seal every one before fixing.
- Moisture: conventional cladding should be about 12 to 20% when fitted.
1. Before you start
Timber cladding is a rainscreen. It throws off most of the rain, but it is not the waterproof layer: the membrane and the ventilated cavity behind it keep the wall dry. Before the timber arrives, check:
- The product: species, profile, size, grade and any treatment or coating match the order and the drawings.
- Fire rules: whether the building needs fire-treated cladding or cavity barriers (see section 11).
- Wind and fixings: on tall or exposed buildings, the batten and fixing design should be checked by an engineer.
- Details: how the cladding finishes at the ground, roof, windows, doors and corners.
| Tools | Materials |
|---|---|
| Tape, spirit or laser level, string line | Breather membrane and membrane tape |
| Mitre or circular saw with a fine-tooth blade | Treated cladding battens (Use Class 3) |
| Drill/driver with pilot and countersink bits | Insect mesh (metal at the base) |
| Moisture meter | Stainless steel screws or ring-shank nails |
| Spacers (2 mm and 6 to 10 mm) | End-grain sealer, or matching paint for coated boards |
| Safety glasses, gloves, dust mask, ear protection | Corner trims, flashings and reveal trims |
2. Delivery, storage and acclimatising
- Check the delivery. Photograph any damage and tell us within 48 hours. Do not fit damaged boards.
- Store it flat and dry, on level bearers at least 100 mm off the ground with a bearer about every 600 mm, out of direct sun and rain.
- Let air get to it. Cover the top but leave the sides open. Never wrap damp timber tightly in plastic.
- Let it settle on site for a few days before fixing, or as the product data sheet says.
- Check the moisture with a meter: about 12 to 20% for conventional cladding (TDCA guidance is 16% plus or minus 4%).
- Sort the boards. Put aside any with large splits, bad bends, decay or damaged coatings.
3. Wall build-up: membrane, cavity and battens
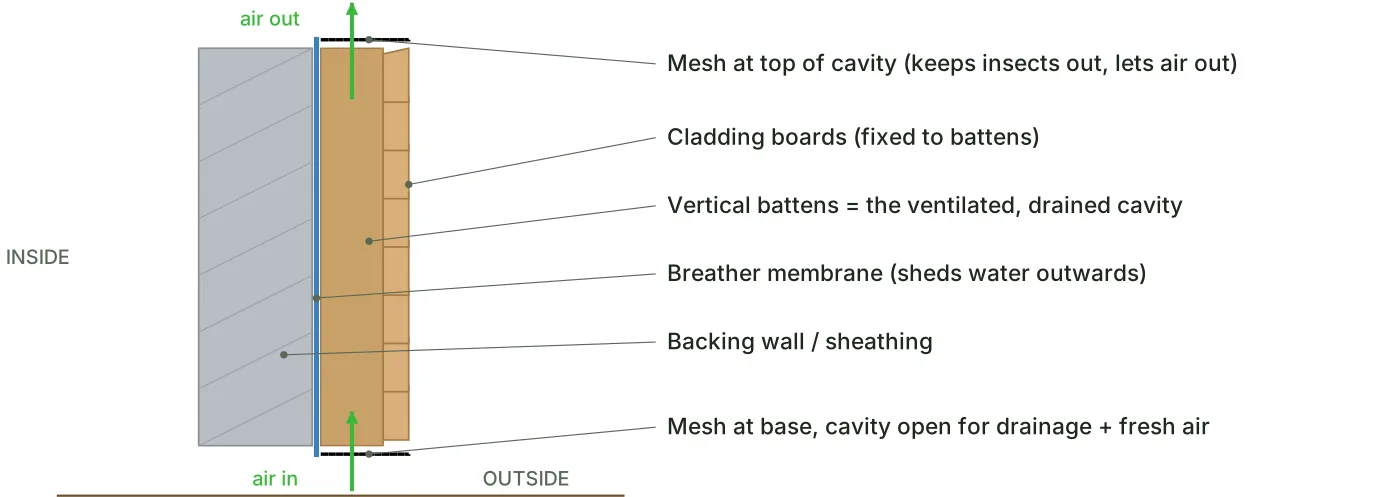
The space behind the boards must let air in at the bottom, out at the top, and let any water drain away. This is the single most important part of the job.
Breather membrane
- Use a BBA- or CE-approved breather membrane suitable for rainscreen cladding.
- Start at the bottom and lap each upper sheet over the one below so water runs outwards. Tape the laps.
- Open-jointed cladding, including rhombus, needs a UV-resistant façade membrane because daylight reaches it.
Cavity
- At least 25 mm deep. 38 mm or more is common and better on exposed sites.
- Open at the bottom and top, protected with insect mesh (metal at the base).
- Never block it with sealant, insulation, mortar or horizontal timbers. Fit cavity barriers only where the fire strategy shows them.
| Item | What to use |
|---|---|
| Treatment | Pressure-treated softwood to Use Class 3. Treat cut ends on site. |
| Size | Typically 50 x 38 mm. Use wider or doubled battens at board-end joints. |
| Spacing | 450 mm centres. Never more than 600 mm, and only above 450 mm if the profile and designer allow. |
| Fixing | Into the structure, with fixings designed for the wall and the wind load. |
Vertical cladding needs two layers of battens
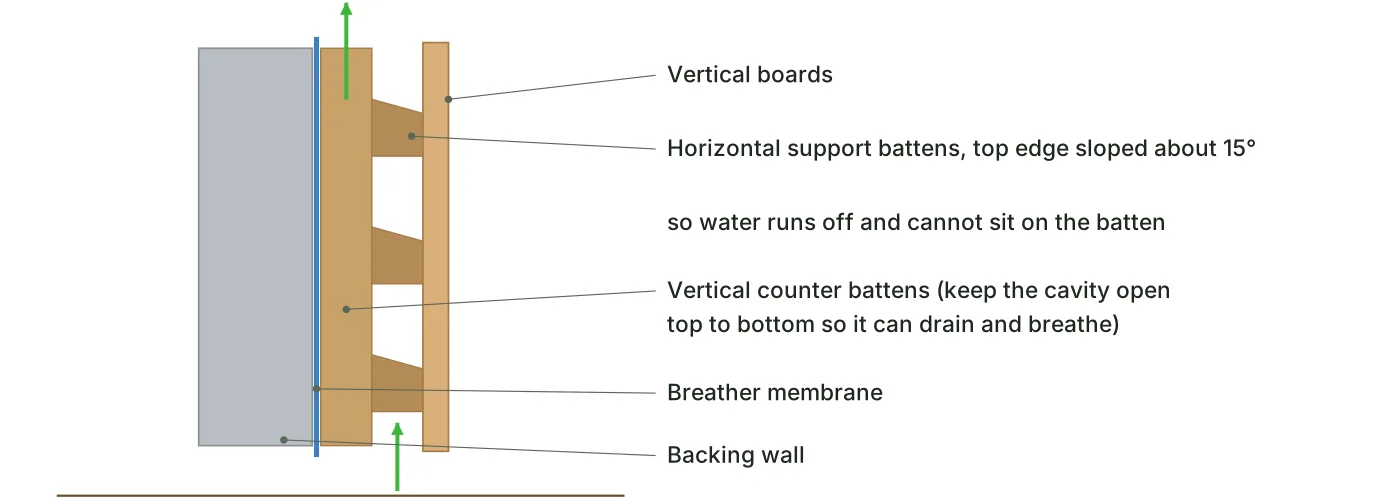
Fix vertical counter battens first, then horizontal support battens across them, with the top edge sloped about 15 degrees so water runs off. This keeps a clear path for air and water from bottom to top.
4. Choosing and using fixings
| Situation | Use |
|---|---|
| Most UK sites | Stainless steel A2 (304) |
| Coastal, pools, industrial or polluted areas | Stainless steel A4 (316) |
| Cedar, Douglas fir, oak, larch and other tannin-rich timber | Stainless steel only: other metals cause black stains |
| Accoya, Kebony, Thermowood, fire-treated boards | Stainless steel, plus any rules on the product data sheet |
- Length: at least 2.5 times the board thickness. For a 19 mm board, use 50 mm.
- How many: boards 100 mm wide or more get two face fixings at every batten, at about the quarter points.
- Ends: at least 20 mm from the board end, pre-drilled.
- Pre-drill hard or brittle timber such as Thermowood, oak and Accoya.
- Drive heads flush, and never fix through two overlapping boards at once.
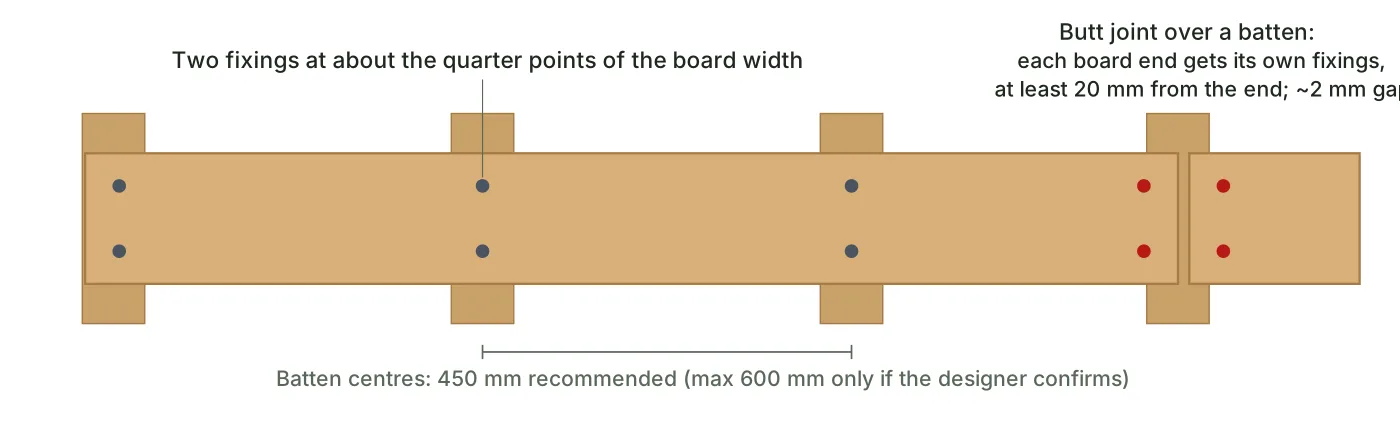
As a guide, with battens at 450 mm centres you need about 41 fixings per m² for TF38 (122 mm cover) and 37 per m² for TF46 (134 mm cover), including 10% extra.
5. Step by step: horizontal cladding
- Set a level start line all the way round with a laser or water level.
- Check ground clearance: at least 250 mm above finished ground, paving or decking unless the drawings show a different detail.
- Fit the base mesh across the bottom of the cavity.
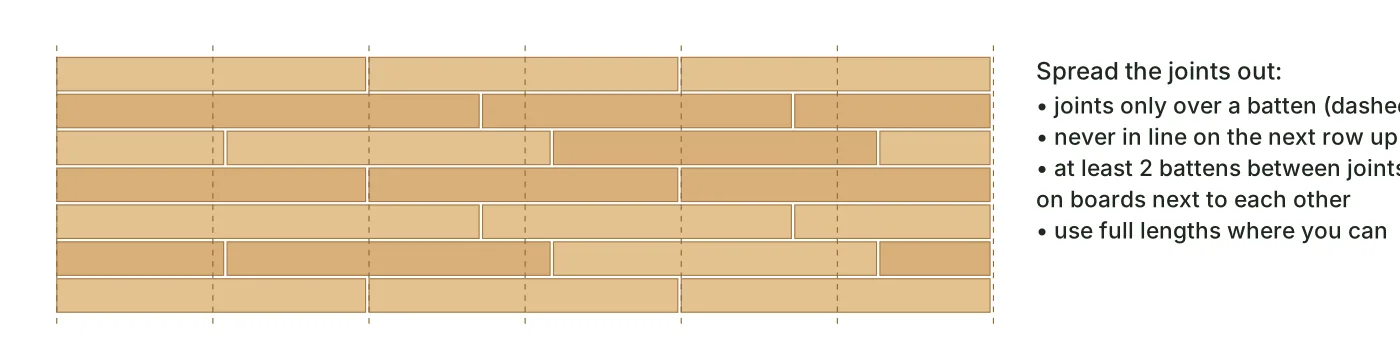
- Plan rows and joints so there is no thin sliver at the top and joints are spread out.
- Fit the first board level and fix it at every batten.
- Work upwards, checking level every few rows. Do not force boards tight.
- Join boards over a batten, with a 2 mm gap and separate fixings for each end.
- Seal every cut end before fixing.
- Form openings and corners (section 6).
- Finish at the top, leaving the cavity open behind the last board, covered with mesh or a ventilated trim.
6. Vertical cladding, corners and openings
Vertical cladding
- Fit counter battens, then horizontal battens with sloped tops.
- Set a plumb start line and check plumb every few boards.
- Cut or chamfer the bottom of each board so water drips off the face.
- Keep the same ground clearance, and never let board ends sit on a sill or paving.
- Use full-height boards where possible. If you must join, use a sloped or stepped joint with a flashing behind.
Corners
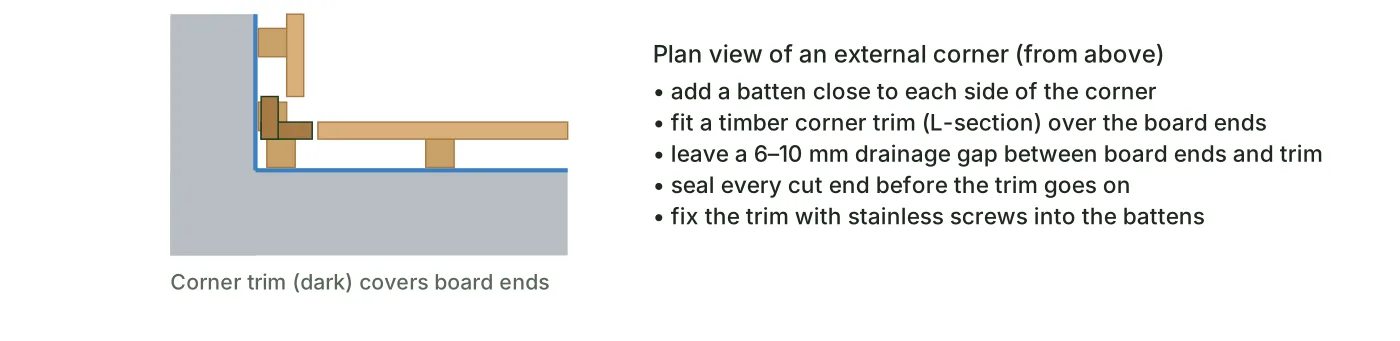
Corner trims are the easiest and most reliable option. Add a batten close to each side of the corner, leave a 6 to 10 mm drainage gap at board ends, seal cut ends and fix the trim with stainless screws. For internal corners, butt the boards to a square timber fillet.
Windows, doors and pipes
- Fit cavity trays, stop ends and flashings above openings so water is turned outwards.
- Sills should project past the cladding with a drip underneath.
- Leave a 6 to 10 mm gap to frames and other materials, and keep air flowing round openings.
- Use purpose-made collars around pipes and vents: sealant alone is not enough.
7. TF38 tongue and groove shadow gap

| TF38 | |
|---|---|
| Profile | Tongue and groove with shadow gap |
| Finished size | 19 x 142 mm (stock Thermowood Radiata Pine); 19 x 194 mm to order |
| Cover width | 122 mm: about 8.2 linear metres per m². A 28.8 m pack covers about 3.5 m². |
| Use | Horizontal or vertical, external or internal |
| Fixings | 2 x 50 mm stainless screws per board at every batten, pre-drilled |
- Tongue up for horizontal fitting, so rain cannot run into the joint.
- Start straight: the shadow lines show every error.
- Engage, do not force. Push each board on until the shadow gap is even. Do not hammer it tight.
- Face fix twice at each batten, at least 20 mm from ends. Always pre-drill Thermowood.
- Keep the gaps even with a spacer or gauge.
- Seal every cut end.
8. TF46 western red cedar shiplap
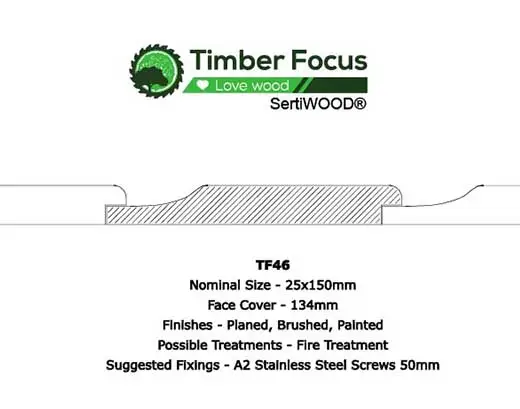
| TF46 | |
|---|---|
| Profile | Rebated shiplap with scalloped face |
| Size | Nominal 25 x 150 mm; finished 18 x 144 mm |
| Cover width | 134 mm: about 7.5 linear metres per m². A 20 m pack covers about 2.7 m². |
| Timber | Imported Canadian western red cedar, PEFC certified, random lengths from 1.83 m |
| Use | Horizontal external cladding, garden buildings and feature walls |
| Fixings | 2 x A2 stainless 50 mm screws or 50 mm ring-shank nails per board at every batten |
- Lap the right way: each board overlaps the one below so the joint points down and outwards.
- Fix clear of the overlap, through the full-thickness part of the board. Never fix through two boards.
- Two fixings per batten, pre-drilled near the ends.
- Stainless only: the natural tannins in cedar stain other metals black.
- Stagger the random lengths, seal cut ends, and let the cedar acclimatise before oiling.
9. TF57 rebated cladding
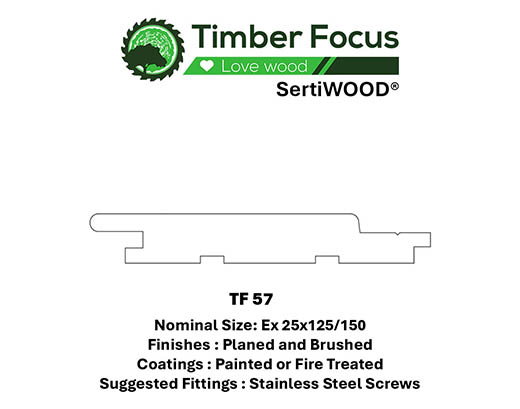
| TF57 | |
|---|---|
| Profile | Rebated overlap with rounded edge and relief grooves on the back |
| Size | Nominal ex 25 x 125 mm or ex 25 x 150 mm. Check the finished size and cover on your data sheet. |
| Finishes | Planed or brushed; painted or fire treated to order |
| Timbers | Austrian and British larch, Accoya, softwood and others to order |
| Fixings | 2 x stainless screws per board at every batten, pre-drilled, at least 2.5 x the board thickness |
- Lap the right way so the joint sheds water outwards.
- Keep the built-in movement gap: do not push boards fully tight.
- Relief grooves face the battens.
- Fix clear of the overlap, pre-drilling larch and Accoya.
- Touch up cuts on coated boards with matching paint. Never plane or sand fire-treated boards unless the certificate allows it.
10. Secret fixing rhombus cladding with Eurotec Façadeclip
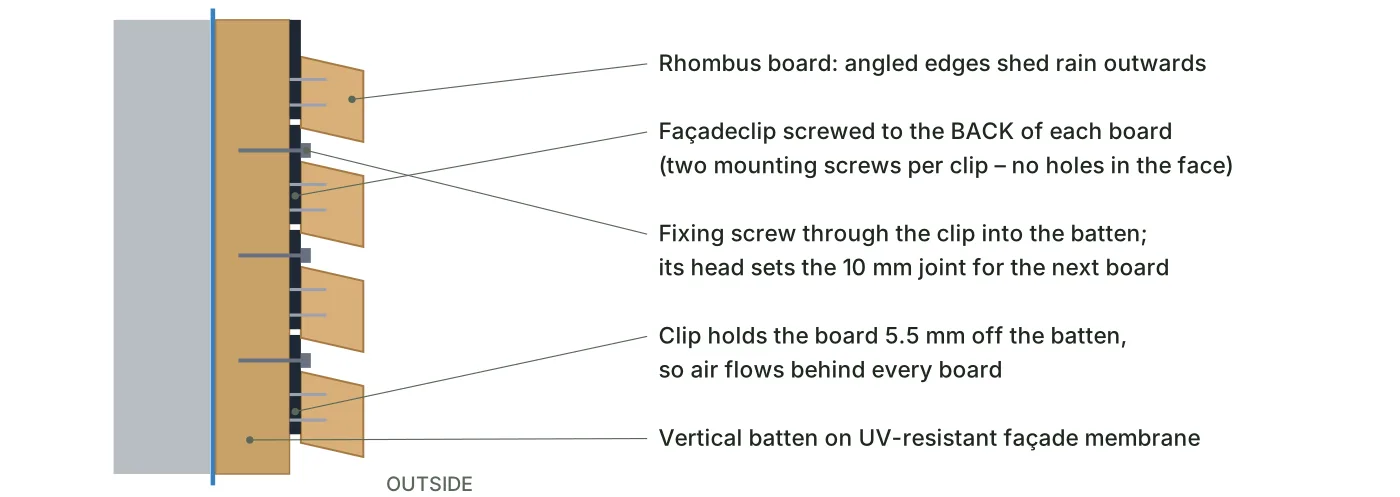
Want a clean façade with no screw heads on show? We stock the Eurotec Façadeclip for secret fixing open-joint rhombus rainscreen boards. The clip screws to the back of each board, so the face is never drilled, and it holds every board off the batten so air can move behind it.
- Buy Façadeclip from Timber FocusF115 x 17, packs of 300 with screws
- Eurotec Façadeclip product pageOfficial assembly instructions, data sheet and drawings
Why use Façadeclip?
- No visible fixings: the weather face stays undamaged, so painted, oiled and charred finishes are not broken by screw holes.
- Even joints automatically: the fixing screw head sets a consistent joint (10 mm as standard).
- Ventilated by design: the 5.5 mm clip holds each board off the batten, so the timber dries quickly.
- Quick to fit: clips go on the boards at the bench, then each row slots onto the one below.
Which Façadeclip do I need?
Choose by the profile height (face width) and thickness of your rhombus board. Each clip comes with one 4.5 x 29 mm fixing screw and two 4.2 mm mounting screws, in packs of 300.
| Clip type | Eurotec art. no. | Profile height | Board thickness | Clips per m² |
|---|---|---|---|---|
| F115 x 17 (our stock) | 946010 | 57–68 mm | 19 mm and over | 24–28 |
| F115 x 22 | 946012 | 57–68 mm | 24 mm and over | 24–28 |
| F130 x 22 | 946015 | 68–80 mm | 24 mm and over | 20–24 |
| F130 x 28 | 946016 | 68–80 mm | 30 mm and over | 20–24 |
| F145 x 22 | 946018 | 80–95 mm | 24 mm and over | 18–20 |
How to install rhombus cladding with Façadeclip
- Prepare the wall with a UV-resistant façade membrane and vertical treated timber battens. Eurotec's examples use 600 mm centres: check your board can span this.
- Cut each board to length and mark the batten positions on the back.
- Screw a clip to the back of each board at each batten mark with the two mounting screws, each clip against the top edge of the board.
- Offset alternate rows by at least 7.4 mm to opposite sides of the batten centre, so neighbouring clips do not clash.
- Fix the first row level onto the battens. The first row needs one extra fixing screw per clip: order these separately.
- Push the next board down until it rests on the fixing screw heads below, then screw its clips to the battens.
- Repeat up the wall, alternating the offsets, and finish the narrow strip at the base with a board cut to size.
11. Fire safety
- Untreated timber cladding is combustible. Near a boundary, or on taller buildings, the Building Regulations may require a higher fire class, or may not allow timber at all.
- In England, combustible materials are not allowed in the external walls of certain residential buildings with a storey 18 m or more above ground. Rules differ in Scotland, Wales and Northern Ireland.
- Fire-retardant cladding (for example Euroclass B-s1,d0) is only valid when installed exactly as tested, and must not be planed, ripped or sanded unless the certificate allows it.
- Cavity barriers and fire stops go where the fire strategy shows them, using the approved type.
12. Cleaning and maintenance
| When | What to do |
|---|---|
| At handover | Check fixings, trims, flashings, and that the cavity is open at top and bottom. Keep photos and batch numbers. |
| Every year | Clear debris from the cavity openings, check fixings and trims, and wash with water and a soft brush. |
| Coated cladding | Touch up damage promptly and recoat when the coating's maintenance guide says. |
| Natural cladding | Needs no coating and will weather to silver-grey. |
Avoid high-pressure washing, which damages the wood fibres and strips coatings.
13. How much cladding do I need?
Measure the wall area, subtract large openings, multiply by the linear metres per m² for your profile, add 10% for waste, and round up to whole packs.
| Profile | Cover | Linear m per m² | Approx. m² per pack |
|---|---|---|---|
| TF38 | 122 mm | 8.20 | 3.5 (28.8 m pack) |
| TF46 | 134 mm | 7.46 | 2.7 (20 m pack) |
| TF57 | See data sheet | 1000 ÷ cover in mm | Made to order |
Shop and specify
Frequently asked questions
Talk to our timber team
Tell us about your project and we will recommend the right species, profile, finish and fire performance. Free samples are available, and we can quote for bespoke milling.